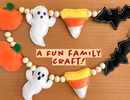
Halloween Felt Garland Tutorial
, by Holly Hetzner, 9 min reading time
, by Holly Hetzner, 9 min reading time
In tutorial, we'll guide you through the process of cutting, sewing, stuffing, and stringing your very own, Instagram-worthy piece of home decor. You can also choose not to string the shapes and use them as felt plush toys, Halloween tree ornaments, or trick or treat candy bag accents. The whole family can have fun decorating each shape with silly or spooky faces! This can also be a good way to introduce someone to simple hand sewing techniques and stitches. Let's get started!
by Holly Hetzner
Please note: this free tutorial is for use with our Halloween Felt Garland Pattern. It is available for purchase here: https://doitbetteryourself.club/products/halloween-felt-garland
I love Halloween. As soon as the leaves start to change, I dig through my tub of decorations and start adding little touches of Halloween to my house. I have ceramic pumpkins, lights, and table cloths galore! I have noise makers, candles, and wreaths! I have candy bowls, treat bags, and silly signs for trick-or-treaters. What I didn't have, I realized, was a cute garland to drape along my mantle. I found a few at my local craft stores that could work, but they seemed expensive or featured only one shape. I realized then that I could design a garland that was cute and cost-effective AND include my two little ghouls (ahem) GIRLS in the crafting process!
So let's get started!
In tutorial, we'll guide you through the process of cutting, sewing, stuffing, and stringing your very own, Instagram-worthy piece of home decor. You can also choose not to string the shapes and use them as felt plush toys, Halloween tree ornaments, or trick-or- treat candy bag accents. (I also made a bat and coated in catnip spray for my cat, Lily. She loves it!) The whole family can have fun decorating each shape with silly or spooky faces! This can also be a good way to introduce someone to simple hand sewing techniques and stitches.

WHAT YOU NEED
You'll first need to purchase and print our Halloween Felt Garland pattern. This pattern is available on our site here: https://doitbetteryourself.club/products/ halloween-felt-garland
Materials:
OTHER INFORMATION
The ghost shape is approximately 5 1/2" (14 cm) tall by 4" (10 cm) wide. The pumpkin is 3 3/4" (9.5 cm) tall by 4" (10 cm) wide. The bat is 6" (15 cm) wide by 3 1/4" (8 cm) tall. The candy corn is approximately 3 3/4" (9.5 cm) tall by 3 1/2" ( 9 cm) wide.
LET'S GET STARTED
Preparing the Shapes
Ghost and Bat
Let's start with the ghost and bat patterns. The process is the same for both, so we will highlight the ghost pattern.
PRO TIP: Lightly sketch the shapes with a pencil, chalk, or a water/heat erasable pen.

Pumpkin and Candy Corn
Crafting the Faces and Other Details
Before we start sewing and stuffing, we need to start making faces and fun details! If you would like your shapes to be plain, skip to the next section. In the examples below, we made a simple ghost face with fabric paint, buttons, and embroidery thread. You can style your faces however you like with materials you have on hand. Allow for drying time if using paint or glue. We also added some simple stitching on the pumpkin. You can add accents to the bat wings or a face on the candy corn shapes too! Get creative!


Need some inspiration for faces? Purchase and download our pattern for some fun ideas!
Sewing the Shapes
Ghost and Bat
Now that our shapes are cut out, and the faces and details are all set, it's time to start sewing! The ghost and bat shapes are sewn with the same process, so we will highlight the ghost.
Need help threading a needle for hand sewing? Take a look at our TikTok video here for a few tips!


DON'T SEW ALL THE WAY AROUND! Leave a small opening and lightly stuff with Polyfill, cotton stuffing, or scrap material. Stuff. Finish sewing. If hand sewing, secure with a knot and cut thread. If machine sewing, make a small backstitch to lock your stitches and then cut your thread.

Pumpkin and Candy Corn
These shapes require piecing before we do the main stitching. Here's how!

2. Sew the pinned pieces using the method of your choice. For both the pumpkin and the candy corn, we used gold embroidery thread and a straight stitch. You can also machine stitch using a straight stitch or a zig zag stitch.


3. Time to start sewing everything together! If hand sewing, prepare your embroidery needle with thread. We suggest 2 ft. (60 cm) of thread per shape. In our example, we used three strands of gold embroidery floss. If machine sewing, prepare your machine with an all purpose sewing needle and thread. Try white, orange, yellow, or gold thread.
4. Begin sewing, leaving a narrow seam allowance, (approximately 1/16th of an inch or .15 cm). Keep your stitches evenly spaced. We used a straight stitch for our examples, but you can also use a back stitch, whip stitch, or mattress stitch. If machine sewing, sew slowly around the shape using a straight stitch.
DON'T SEW ALL THE WAY AROUND! Leave a small opening to lightly stuff with Polyfill, cotton, or scrap material. Stuff. Sew until finished. If hand sewing, secure with a knot and cut thread. If machine sewing, make a small backstitch to lock your stitches and then cut your thread.

Stringing the Garland
Time to make your shapes into garland! If you do not want to make garland and instead want to keep your shapes as toys or decorations, stop here! You're done!
