
Guest Blog by Spindle and Seams
So, the ever so cute Babe Hoodie is absolutely perfect for all seasons. Make it with a light weight athletic knit for the perfect addition to your gym gear. Make it out of mesh or lace for an awesome swim cover up. Make it in some quilted double knit for a great 3 season vest or hoodie. The possibilities are endless. There are 2 parts to this hack. You can totally choose one, the other, or do both (like mine).

Part 1: Color-Block Hack
Start by choosing your pattern options and cutting out your pattern pieces. All except for the front bodice, back bodice and the zipper facing (if you are following this through to the half zip hack). If you are following this tutorial all the way through to the half zip up option choose to cut your front bodice as directed for the pullover option with the modifications shown below. Do not cut the bodice as directed for the full zip option. Also, in the case of the half zip you will want to cut out the zipper facing pattern piece differently than directed. We will modify that in part 2 of this tutorial.
Sketch cut lines onto your pattern pieces according to the drawing below; the front bodice, back bodice and Zipper Tab Facing (if doing the half zip). Be sure to create gentle curves and not to come too close to the neckline on the front bodice. You should leave at least 2.5 inches between the neckline and apex of your curve.
You will add seam allowances for color blocking in the next step so don’t cut your fabric just yet. I will come back and discuss modifying the Zipper Tab Facing piece in Part 2 of this tutorial so you can set this piece aside for now.

Once you have your curves drawn, cut your pattern pieces along those lines. Don’t worry; you can tape them back together afterward if needed.


Be sure to read through this entire step before cutting out your color-block bodice pieces from your fabric. For the color-block bodice pieces that you just cut, you are going to add an extra 3/8” along the joining edges when you cut them from your fabric in order to add seam allowance. Do not skip this step. It’s crucial to achieving the correct fit. Be sure to do this for both front and back bodice pieces. See images below.


Now pin or clip the top and bottom pieces right sides together to for both front bodice and back bodice. Stitch along dotted lines as indicated below with a 3/8” inseam.
This is and example of what you should end up with after attaching pockets:

Now lay your now complete bodices out flat. Press the seams open and topstitch them using a lengthened straight stitch or stretch stitch. If you are just using the color-block portion of this tutorial you can now switch back over to the DIBY pattern tutorial and follow the instructions the rest of the way to complete your hoodie. If you are going to install the half zip, stop before attaching the hood and follow along with Part 2 of this tutorial.

Part 2: Adding the Half Zip


Materials Needed:
- Wonder Tape
- 10″-12″ Zipper (You’re preference based on your sizing)
- 12″ x 2″ strip of fusible interfacing (optional, for use with unstable knit to add rigidity)

Choose a coordinating zipper and lay it on your bodice. Decide the length that you want your zipper so that it does not interfere with any pockets you may have already installed.
For this quilted version I chose to create a 10″ zipper. The zipper I had on hand was an absolute perfect color match but it was 22″ long. Darn! That wasn’t going to work in its current state. I needed to shorten it. Here is a very quick and easy way to shorten those zippers. Check out this video tutorial.
Now lay your zipper on top of the zipper tab facing pattern piece. Trim it shorter by lining up the zipper stop as indicated in the illustration. Cut out your zipper Tab Facing from your fabric, prepare it as detailed in the pattern instructions and set aside.


Find the centerline of your front bodice from the neck down by measuring and leaving a pin trail. Be careful to do this correctly, you don’t want a crooked zipper installation.

If you’re using an unstable knit, now is the time to iron on a 12″ x 2″ strip of fusible interfacing along your marked line to prevent your cut line from stretching out. Make a small straight snip at the center of your neckline. Cut about 1.5″ in.

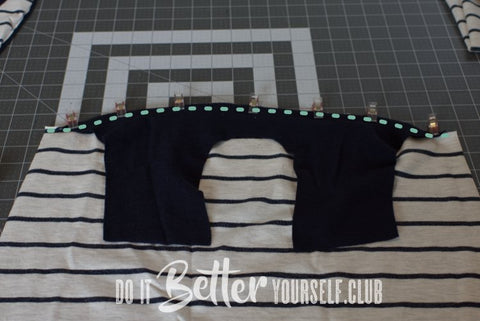
Now attach your hood, lining up the raw edge near the hood front with the raw edge of your snipped line.


Pull out your wonder tape (double sided wash away tape is carried at Joanns locally or Amazon online). Pick up your zipper assembly that you set aside and secure it with the wonder tape in the location shown below. This will dramatically help keep your zipper in place during construction.

Line up the top of your zipper facing with the top of your hood neckline, making sure it is following your straight line of pins. Take note of the location of the bottom zipper stop (or whipple stitch if your zipper was shortened) and 1/2″ above it.

Now turn your hood inside out and mark those locations on the backside. For me it was markings at about 9.5″ and 10″.

CAREFULLY cut straight down your pin line, stopping at the first mark; about 1/2″ above the zipper stop location. At this location very carefully cut a narrow triangle up to (but not into) that zipper stop mark. Be very careful here! If you cut too far you risk having to do some crazy modifications to your hood and bodice zip line to make it work. Double check your measurements. If anything, you can cut shy of these marks so that you may cut them just a little further if needed.

Turn your hoodie right side out and lay your zipper and facing open and right side up over the line you just cut. You’re going to twist each side inward to match up with your cut line.

But first, get out that wonder tape and line the edges of your cut. This will make it SO MUCH easier to keep straight while you are stitching.

Now twist those zipper sides one at a time and attach them with the wonder tape so they are face down on your bodice.


Stitch down the edges as indicated with a 1/4″ inseam. Go as far down as you can comfortably, around 1.5″ above the bottom.

Flip the zipper over to its proper place.

Turn your hoodie inside out. Locate the remaining unstitched zipper. Fold your bodice so that you can complete these stitches from the wrong side without catching anything else in the seam. Do this on both sides of the zipper as well as on the bottom where you have created that triangle.


Turn your hoodie right side out. Be sure you caught an adequate seam allowance in your zipper attachment and that there are no holes. To finish off the look, top stitch around the entire zipper. This will also give it a little more strength.

Congratulations, you’re finished! It gets much easier with some practice so don’t shy away from these zippers!
-- Originally authored by Kelly Bailey. Archived by Holly Hetzner.