
How to Color Block with Lace Sewing Tutorial
, by Kathryn Graham, 3 min reading time
, by Kathryn Graham, 3 min reading time
It just keeps getting warmer outside, so I just keep sewing more lace! This time around I had a cardigan on the brain. I love the look of cardigans but not so much a fan of too many layers in the warmer months. Because apparently Utah doesn’t believe in spring. It’s either winter or summer around here.
This is what inspired a more cool option for my next cardigan. Enter the lace color blocked cardigan!

I’ve seen this style of cardigan in the local boutiques quite frequently, which means I totally needed to take a stab at doing it myself. Wanna do it with me? Let’s roll…
The lace I’m using in this tutorial is from Surge Fabric Shop. You should totally get your lace from there too if you like hard working small business ladies that care about their customers or whatever.
I recommend her stretch lace for this project. Non-stretch lace will look very stiff if it’s blocked next to knit fabric.
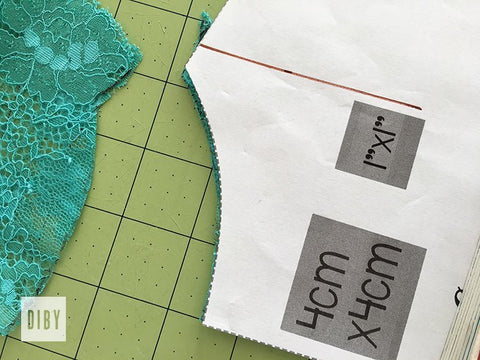
The first step is measuring the width of your lace. Measure at the narrowest point.

Take this measurement and divide it by two then subtract 1/2″. For example, my width was about 8″. So after dividing by two then subtracting 1/2″ I came up with 3 1/2″.
Grab the back panel piece for your cardigan. For this tutorial I’m using the Cocoon Cardigan by Patterns for Pirates, but any cardigan (or shirt pattern) with a back panel on the fold will work.
Take your new measurement and mark out that far from the fold line on your back panel piece both at the top and the bottom of your pattern piece.


Fold your lace in half lengthwise.

Align your pattern piece on the fold of your lace and trace out from the fold line, past the marking by 1/2″ (this should bring you to the edge of your lace). Do the same thing for the bottom of the pattern piece as well. Then cut along the tracing marks.


Now it’s time to get the side blocks of the back panel ready. Grab your fabric and fold it over so that you easily get two mirroring pieces for these side blocks.
Place your pattern piece on top AWAY FROM THE FOLD. Then trace around stopping at your markings. Draw a notch out so that it’s obvious where you stopped.


Remove the pattern piece then use a ruler to mark outward another 1/2″ from the line. You will do this on both the top and the bottom. Then connect the lines.


Cut along your lines to reveal two beautifully mirrored side block pieces. Ignore my nasty crease on the one side. I was feeling way too lazy to press it out. Don’t be like me…

At this point you should have two mirroring side blocks and one center lace piece.

Lay one of your side blocks over your lace piece with the right sides together and serge or sew them together with a 1/2″ seam allowance.


Press the seam out toward the fabric (away from the lace) and repeat with the other side block.

Topstitch over top of the seam to keep it laying flat away from the lace while you wear it.


Then go ahead and assemble the rest of the garment according to the instructions!

Originally Authored by Jessica Hooley. Archived by Kathryn Graham.